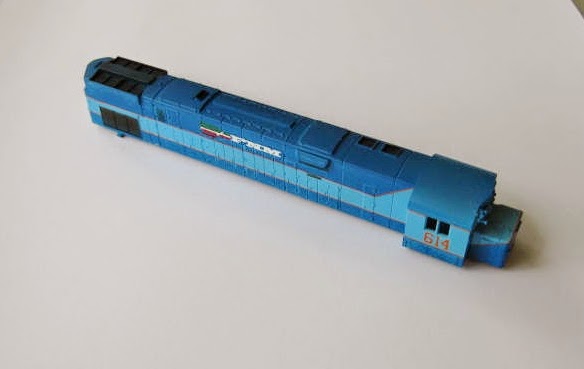
The last two locos.
I wanted to get the last two Alcos decaled and weathered to be able to hand them back to Graham before Christmas.
I did all of the usual things one needs to do when applying Micro Scale decals only this time I did wait until the decal had completely dried before applying the Solvaset. I was able to get more decals laid at the one time so that helped speed up the process. These orange stripes are very fragile and I have to admit that there is a couple of bloopers in a few spots. All wear and tear will be the story to Graham and I'm sure he will be okay with the results not to worry too much.
Once the decals had been washed I then gave the body shells a good spray of Dull Cote as per my previous posts.
I did not want to go too heavy with the weathering on these two C630's so each of the 4 I have done should look a little different once running on the KCS. I used the Black Tamyia Panel Line Accent Paint to add just a smidgin of colour to each panel line, around all of the flat panels and doors along the top and sides of the body of the locos with a very light wash on the walkways.
The top grills of the loco got a wash of black whilst the side rear grills got a wash of the Panel Paint Brown. I then wet the area around the exhaust with the panel Black and then dabbed in some Pan Pastel Black to make the top look more like exhaust smoke stains.
The trucks on these two received a brush coat of flat black and when dry I dusted them with some Pan Pastel grey and a small amount of rust to bring out some of the details.
So that's the last of these four Alcos. It will be good to see them on the KCS when a few of us head there for a run tomorrow.
Here's just a couple of shots as they sit with the body's yet to be added to the chassis.
That's it for another day so thanks again for stopping by.
Rod.
From now on this blog will cover the construction of my new RR in HOn3 however you will still be able to view my now fallen flag SFRSD as it will remain.
17/12/2014
10/12/2014
Custom Painting Part 5
Next on the list was an Alco C424
This is the second of four locos to weather for Graham. I decided to tackle the C424 just so I could do a different model. I used pretty much the same technique that I used on the last loco in my post Custom Painting Part 4.
I had some issues with the decals moving on the last one as I applied the Solvaset so this time I made sure I waited until the decal had completely dried before applying it. I also added more of the striping before moving onto the next stage and this helped cut down the amount of time taken to apply all the decals and sped up the whole process.
The trucks got a brush of flat black then a light dry brush of rust on the springs, brake cylinders and brake blocks.
Here are a few of the images of the body of C424 with the windows fitted and the walkway added but not fitted to the chassis as Graham needs to add a decoder to this unit before it can earn its keep on his RR.
Graham mentioned that when the first unit that received the weathering treatment was put on the tracks it has made the rest of his roster look too new, so I guess you know what that means more weathering to be done on the Kansas City Southern RR fleet. I'm up for it.
Thanks for stopping by
Rod.
This is the second of four locos to weather for Graham. I decided to tackle the C424 just so I could do a different model. I used pretty much the same technique that I used on the last loco in my post Custom Painting Part 4.
I had some issues with the decals moving on the last one as I applied the Solvaset so this time I made sure I waited until the decal had completely dried before applying it. I also added more of the striping before moving onto the next stage and this helped cut down the amount of time taken to apply all the decals and sped up the whole process.
The trucks got a brush of flat black then a light dry brush of rust on the springs, brake cylinders and brake blocks.
Here are a few of the images of the body of C424 with the windows fitted and the walkway added but not fitted to the chassis as Graham needs to add a decoder to this unit before it can earn its keep on his RR.
Graham mentioned that when the first unit that received the weathering treatment was put on the tracks it has made the rest of his roster look too new, so I guess you know what that means more weathering to be done on the Kansas City Southern RR fleet. I'm up for it.
Thanks for stopping by
Rod.
28/11/2014
Last nights Ops Session
Another Friday ops night
Had most of the crew around last night for the regular monthly operating session on the SFRSD.
I usually send out a bulletin that is the official notice to all the guys that the night is on. Actually there are a few of us that hold sessions through out the year so at the beginning of each year we send out a calendar so we can all fit in with one another.
Last weeks bulletin was number 92 so there have been the odd one or two over the years sent to the guys.
Not all the guys could make last nights session so we just had the just nine of us.
After show and tell (which can take up to half an hour on some nights) the session swung into action with the fast clock set to 4 to 1 and starting at 6.45 am. This gives the yard masters at Augusta and Flynn plus the crew for the first two trains time to acquire their locos and hook up the pre-staged trains #1 and 2.
Train #1 is a loaded grain train that departs Augusta at 7.10 am headed for Flynn while train #2 and empty grain leaves Flynn at 7.30 am. These two meet at Red Rock if the dispatcher is doing his job (I took the first session) and Greg J took the next.
Here are a few snaps from the night.
I want to thank all my crew for helping to make all of my operating sessions so much fun this and previous years.
Catch you next time.
Rod.
Had most of the crew around last night for the regular monthly operating session on the SFRSD.
I usually send out a bulletin that is the official notice to all the guys that the night is on. Actually there are a few of us that hold sessions through out the year so at the beginning of each year we send out a calendar so we can all fit in with one another.
Last weeks bulletin was number 92 so there have been the odd one or two over the years sent to the guys.
Not all the guys could make last nights session so we just had the just nine of us.
After show and tell (which can take up to half an hour on some nights) the session swung into action with the fast clock set to 4 to 1 and starting at 6.45 am. This gives the yard masters at Augusta and Flynn plus the crew for the first two trains time to acquire their locos and hook up the pre-staged trains #1 and 2.
Train #1 is a loaded grain train that departs Augusta at 7.10 am headed for Flynn while train #2 and empty grain leaves Flynn at 7.30 am. These two meet at Red Rock if the dispatcher is doing his job (I took the first session) and Greg J took the next.
Here are a few snaps from the night.
| Brendan was in charge of Flynn Yard while Ron works beside him. |
| John likes to look after the Augusta Yard. Here he is studying the car cards for the next train. |
| Here's Greg at the dispatchers desk. Brendan and Ron are at Flynn. |
| Dennis, Vic and Noel are at Winfield. Just caught Vic at a bad time. |
| And here's Darren patiently waiting for his train |
| I got to run the mixed freight from Augusta to Flynn and so added the track geometry car | for its first run. |
Catch you next time.
Rod.
23/11/2014
Custom Painting Part 4
The next step
After getting all the decals on, sealed with Solvaset and washed clean I asked Graham if he would let me have a go at weathering his loco. I was happy that he said yes as I could see that these Alco locos on the FNM were not that well cared for so weathering number 614 should hopefully come out looking like it was earning its keep once added to his fleet.
My first task was to give the shell a wash to remove any decal setting solution. I did this in some luke warm water with just a hint of washing liquid in the water to help remove any contaminants. I let it air dry for a while and then the fun began. (Fortunately we had some warm weather so it did not take long for it to dry).
The next step was to make the paint look like it had faded under the hot Mexican sun so I set about spraying the body, handrails and the fuel tank with a mix of Tamiya flat white mixed with a very small amount of Tamiya Red / Brown. This gave me a very light buff colour as a base on which to start the weathering.
I took a very small amount of metal silver and dry brushed the trucks after I had given them a brush of flat black. This gave them a bit of highlight and made them look a little more worn around the edges.
Once the body and other items had dried (and that took no time at all) I gave them a spray of Testors Dullcote straight from the rattle can to seal the paint ready for the next step.
I grabbed my bottle of Tamiya Panel Line Black and using about a 1/2 inch wide flat brush gave the whole body, fuel tank and walkways a wash only taking paint from the top of the bottle so it was not stirred and not too dark. Once this dried I took out some burnt umber oil paint mixed a dab with odourless thinners and added just a hint along the top of the body, on the nose and in the grills toward the back on the top also. I added a small amount on the fuel tank and on the trucks. I let all of this dry for quiet a while. Once dry I hit the top and sides of the body with some Pan Pastel Burnt Sienna pastels. I rubbed this in with a Pan Pastel applicator to get an even coat as this helped dull down the body even more. Another spray of DullCote and that was the body done.
I'm rather happy the way Alco number 614 has turned out now Graham has to add a decoder (hopefully a loksound) and put it all back together and get it to earn its keep on his RR.
My images are off a bit however here they are for what they are worth.
After getting all the decals on, sealed with Solvaset and washed clean I asked Graham if he would let me have a go at weathering his loco. I was happy that he said yes as I could see that these Alco locos on the FNM were not that well cared for so weathering number 614 should hopefully come out looking like it was earning its keep once added to his fleet.
My first task was to give the shell a wash to remove any decal setting solution. I did this in some luke warm water with just a hint of washing liquid in the water to help remove any contaminants. I let it air dry for a while and then the fun began. (Fortunately we had some warm weather so it did not take long for it to dry).
The next step was to make the paint look like it had faded under the hot Mexican sun so I set about spraying the body, handrails and the fuel tank with a mix of Tamiya flat white mixed with a very small amount of Tamiya Red / Brown. This gave me a very light buff colour as a base on which to start the weathering.
I took a very small amount of metal silver and dry brushed the trucks after I had given them a brush of flat black. This gave them a bit of highlight and made them look a little more worn around the edges.
Once the body and other items had dried (and that took no time at all) I gave them a spray of Testors Dullcote straight from the rattle can to seal the paint ready for the next step.
I grabbed my bottle of Tamiya Panel Line Black and using about a 1/2 inch wide flat brush gave the whole body, fuel tank and walkways a wash only taking paint from the top of the bottle so it was not stirred and not too dark. Once this dried I took out some burnt umber oil paint mixed a dab with odourless thinners and added just a hint along the top of the body, on the nose and in the grills toward the back on the top also. I added a small amount on the fuel tank and on the trucks. I let all of this dry for quiet a while. Once dry I hit the top and sides of the body with some Pan Pastel Burnt Sienna pastels. I rubbed this in with a Pan Pastel applicator to get an even coat as this helped dull down the body even more. Another spray of DullCote and that was the body done.
I'm rather happy the way Alco number 614 has turned out now Graham has to add a decoder (hopefully a loksound) and put it all back together and get it to earn its keep on his RR.
My images are off a bit however here they are for what they are worth.
| These top two images show the decaling finished |
| Sprayed with my mix of flat white and red/brown |
| And how the body looks after a bit of work |
The cab is not sitting as it should as the windows need fitting since they were removed to assist in painting without having to clean them.
Once Graham has completed all of the assembly hopefully I can grab an image to show how it looks completely assembled.
Well that's it for today now onto decaling number two an Alco C424.
Thanks for popping in.
Rod.
19/11/2014
Custom Painting Part 3
Decalling the Alcos
Graham the owner of the 4 Alco's that I painted way back in May this year has been a very busy man. Lots to do let-alone do much modeling so I offered to do the decalling on the 4 of them.
So after we finished up one of our regular Friday get togethers I left Grahams place with several small plastic boxes containing 4 chassis, 4 sets of Alco body parts and 4 sets of Microscale decals in my hand.
Graham had purchased 4 sets of Microscale 60-4081 FNM Locomotives National Railways of Mexico 1991+ decals and having used MS decals before I knew that they would be good to apply.
So job one was to try and find some decent coloured images of a FNM Alco 628. That was not that easy as they are far and few between. Having said that I did find one that was sort of ok to use at least as a basis of what was needed.
Man what a job, the decal stripes that separate the two blues are just so fine and to top it off they meet at the back and even go up and across the tip of the nose of the loco. Fortunately Micro Scale provides a good number of stripes on the decal sheet just in case. Carefully cutting between the stripes was a necessity so a new #11 blade and a nice straight metal rule was used to get that done. I use an old glass plate from the kitchen (note to self go get a nice piece of flat glass) on which to cut out all of my decals. This gives a nice crisp edge.
I started on the left hand side with the first stripe letting it dry on the body and then giving it a coat of Solvaset. I have owned this bottle for about 20 years and thankfully it still has some life in it, not much left but still going strong.
I rushed a bit adding the Solvaset before the decal had completely dried so they did move a bit which did cause some bad words. Still over the past 3 days working on an off waiting for each application to dry the first loco is done. The weather has helped as it is 30C (90 F) outside so a nice temp inside in which to work but also get the decals to dry quickly.
Here are just a few shots of work in progress and completed prior to weathering.
I tried to get some shots outside however the wind was kinda strong and was going to blow the lot over the next doors fence. So these will have to suffice for this post.
I think I might have a break from decalling for a while and tackle the weathering on Alco # 614 next. So we will see what it looks like on the next post if all goes well.
Thanks for coming by.
Rod.
Graham the owner of the 4 Alco's that I painted way back in May this year has been a very busy man. Lots to do let-alone do much modeling so I offered to do the decalling on the 4 of them.
So after we finished up one of our regular Friday get togethers I left Grahams place with several small plastic boxes containing 4 chassis, 4 sets of Alco body parts and 4 sets of Microscale decals in my hand.
Graham had purchased 4 sets of Microscale 60-4081 FNM Locomotives National Railways of Mexico 1991+ decals and having used MS decals before I knew that they would be good to apply.
So job one was to try and find some decent coloured images of a FNM Alco 628. That was not that easy as they are far and few between. Having said that I did find one that was sort of ok to use at least as a basis of what was needed.
Man what a job, the decal stripes that separate the two blues are just so fine and to top it off they meet at the back and even go up and across the tip of the nose of the loco. Fortunately Micro Scale provides a good number of stripes on the decal sheet just in case. Carefully cutting between the stripes was a necessity so a new #11 blade and a nice straight metal rule was used to get that done. I use an old glass plate from the kitchen (note to self go get a nice piece of flat glass) on which to cut out all of my decals. This gives a nice crisp edge.
I started on the left hand side with the first stripe letting it dry on the body and then giving it a coat of Solvaset. I have owned this bottle for about 20 years and thankfully it still has some life in it, not much left but still going strong.
I rushed a bit adding the Solvaset before the decal had completely dried so they did move a bit which did cause some bad words. Still over the past 3 days working on an off waiting for each application to dry the first loco is done. The weather has helped as it is 30C (90 F) outside so a nice temp inside in which to work but also get the decals to dry quickly.
Here are just a few shots of work in progress and completed prior to weathering.
| The locos will get a wash before the coat of dullcoat is applied |
| The 2 images above show the completed decalling after a wash and following a spray of Dullcoat |
I think I might have a break from decalling for a while and tackle the weathering on Alco # 614 next. So we will see what it looks like on the next post if all goes well.
Thanks for coming by.
Rod.
09/11/2014
Next BDL install
The turnout block detection
Currently all of the turnouts on the SFRSD are included in the mainline detected blocks through each of the towns excluding the arrival turnouts at Augusta and Flynn.
This was done for expediency as we wanted to get the panel up and running for the N Scale convention now over 18 months ago. In fact it is two years ago this month that all of the detection work was being carried out to get to the first phase of ABS.
This worked very well however in some instances it is difficult for the dispatcher to see exactly where the train is stopped as the main line and turnouts all show red. The train might very well be stationary at the signal but the dispatcher cannot see that on the panel.
After discussing with the panel pro master along with the wiring crew it was agreed that this could be an easy fix. There are several open connections on the BDL that serves Guthrie that can be hooked up without any outlaying of funds and only one more BDL would be required to complete Red Rock, Ponca City, Hackney, Winfield and Udall.
So after my fun and finance minister approved a grant for a new BDL off went the order.
The BDL arrived a week or so ago and so I asked a good friend John C if he would be willing to wire up the 4th BDL. John had done the first 3 so it was good to have them all wired the same. The BDL was wired and delivered on Saturday so I set to and mounted it under the peninsular where the towns of Ponca City and Hackney reside, this afternoon. This also allows me to continue the loco net cable from the last SE8C that also resides at this location. This is the only BDL mounted so far away from the On Guard Circuit Breakers and done for a reason. It will only require the power and earth cables to be run and not each block wire as was done with the other three. Another lesson learnt.
So here is the fourth BDL168 #10 ready for the power, earth and block wires to be installed.
We all learnt many years ago that there are terminal blocks and there are terminal blocks. The ones we used are from Altronics and are by far the best we have come across. They have a metal strip below the clamping screw so you get a much better outcome with the wire being held nice and firm and not coming loose as the standard screw only blocks.
Who said DCC only need 2 wires LOL
So once the lads are free to help we can get underway.
Thanks for taking the time to drop by.
Rod.
Currently all of the turnouts on the SFRSD are included in the mainline detected blocks through each of the towns excluding the arrival turnouts at Augusta and Flynn.
This was done for expediency as we wanted to get the panel up and running for the N Scale convention now over 18 months ago. In fact it is two years ago this month that all of the detection work was being carried out to get to the first phase of ABS.
This worked very well however in some instances it is difficult for the dispatcher to see exactly where the train is stopped as the main line and turnouts all show red. The train might very well be stationary at the signal but the dispatcher cannot see that on the panel.
After discussing with the panel pro master along with the wiring crew it was agreed that this could be an easy fix. There are several open connections on the BDL that serves Guthrie that can be hooked up without any outlaying of funds and only one more BDL would be required to complete Red Rock, Ponca City, Hackney, Winfield and Udall.
So after my fun and finance minister approved a grant for a new BDL off went the order.
The BDL arrived a week or so ago and so I asked a good friend John C if he would be willing to wire up the 4th BDL. John had done the first 3 so it was good to have them all wired the same. The BDL was wired and delivered on Saturday so I set to and mounted it under the peninsular where the towns of Ponca City and Hackney reside, this afternoon. This also allows me to continue the loco net cable from the last SE8C that also resides at this location. This is the only BDL mounted so far away from the On Guard Circuit Breakers and done for a reason. It will only require the power and earth cables to be run and not each block wire as was done with the other three. Another lesson learnt.
So here is the fourth BDL168 #10 ready for the power, earth and block wires to be installed.
We all learnt many years ago that there are terminal blocks and there are terminal blocks. The ones we used are from Altronics and are by far the best we have come across. They have a metal strip below the clamping screw so you get a much better outcome with the wire being held nice and firm and not coming loose as the standard screw only blocks.
Who said DCC only need 2 wires LOL
So once the lads are free to help we can get underway.
Thanks for taking the time to drop by.
Rod.
26/10/2014
The Pilbra Cab
Noels West Coast Mining Locos
I thought that I would add a few images of the Pilbra Cabbed locos showing the brass etching done by Vic and added to the locos by Noel for his West Coast Mining RR. after showing some of the completed units during the operating on the SFRSD on Saturday night in my post yesterday.
Noel and Vic have done a fantastic job with these unique looking locomotives that now look the part hauling iron ore from the mine to his rotary ( yep I said rotary ) dumper on his WCM RR.
If ok by Noel I'll ask him if I can post some shots of the completed locomotives to show just how nice they look but first I need to take the shots.
Thanks for stopping by.
Rod.
I thought that I would add a few images of the Pilbra Cabbed locos showing the brass etching done by Vic and added to the locos by Noel for his West Coast Mining RR. after showing some of the completed units during the operating on the SFRSD on Saturday night in my post yesterday.
Noel and Vic have done a fantastic job with these unique looking locomotives that now look the part hauling iron ore from the mine to his rotary ( yep I said rotary ) dumper on his WCM RR.
If ok by Noel I'll ask him if I can post some shots of the completed locomotives to show just how nice they look but first I need to take the shots.
Thanks for stopping by.
Rod.
Subscribe to:
Posts (Atom)