11/07/2014

Something a bit different

Operating night on the Boise City Sub
     Last night was the first operating session we have had for a while on our good friend Johns AT&SF Boise City Sub for almost 6 months.
     John had decided some time back to add dispatching to his excellent Santa Fe Boise City Sub N Scale RR. We operate on it several times a year and John like me had issues of some operators moving trains from towns to the next without checking if they had a clear run to do so. John had already fitted some of our mate Vics excellent SF style signals that worked off his turnout switch   these looked good but did not allow for the holding of trains, so having a dispatcher was the next move.
    John started his RR going straight to DCC back in the late 1990's so one big job was to determine where all of his blocks needed to be, others were to remove all of his facias, assemble and install heaps of signals and work out all of the logic to develop the JMRI track panel to suit his RR.
    Help along the way from our resident JMRI expert Brendan and some help with installation by a couple of the operators of some signal PCB boards and in what seemed like no time Johns system was up and running again. A shake down test was held in the month of May which found a few bugs but proved the system was working however the true test was to be the operating session planned for and held last night.
    One other test that was taking place was the use of small two way radios for the crew and dispatcher to use to communicate.
    Of the eleven or twelve guys that usually turn up for one of our sessions unfortunately due to unforeseen circumstances only five could make it to Johns to participate in this special night.
   Well by the time I arrived Greg and John had the radios out of their packets Batteries in and testing. Greg, John, Brendan and I purchased 4 sets each so we could share them around each others RR when holding ops sessions. I quickly plugged my head set in attached it to my ear and straight away could hear the guys talking very well.
    John had set up his dispatchers desk beneath his layout nicely tucked in out of the way but easily accessible so once the rest of the nights crew arrived hooked up their head sets we were off and running.
     John has done a great job as the night went off without a hitch. The engineers now know to contact the dispatcher with their train number and location and are now given instructions via radio instead of the old shout & holler system that was starting to get out of hand especially when we have the full crew available. The signals, dispatcher and radios all worked very well and all of the guys agreed that the night was a hit so well done Big John.
    Here are a few images of the night.

Here is the owner of the Boise City Sub working the dispatchers panel at the first true ops session.

Looking right at home. Note the two camera monitors mounted above the monitor, neat uh.
Vic (with the cap) waiting for the Amarillo Yard operator Noel to make up his train.
Dennis working the Boise City local at Etter.

Greg running the Boise City yard. Greg owns the L&N RR and is currently working on a dispatching and signalling system for his RR.
    
Boise City Station
Just a few of the locos at Boise City.
This is a duplicate of the dispatchers panel so crews can see what the system looks like and keep track of the time with the fast clock.
The monitor sits at the end of the yard peninsular with all of the car card holders and timetable etc.
A typical Friday night timetable.
     Me, I ran the Amarillo local to Dumas and back, took the photos and had a great time.
A great and successful night once again on the AT&SF Boise City Sub.
Thanks John.
Rod.

29/06/2014

GHQ Crawler Shovel

One more piece to the RR

     As mentioned in my last post I had completed the GHQ shovel. Whilst not a hard kit to put together the real tricky bits are the pistons that control the arm as these can be a real headache to get correct. having said that this kit has turned out ok.
    A spray of Tamiya Bright Orange, a coat of dull coat and a wash with Van dyke Brown oil paint and a couple of light applications of Tamiya Panel Line Accent Paint and its ready to sit in the construction area. Wait I have no construction area.
    Now that all of these GHQ kits are almost complete I have decided that a small asphalt paved area needs to be made adjoining the Augusta East yard tracks. This is a nothing area and as it was completed many years ago it is indeed in need of an upgrade.

This is the completed GHQ shovel.

After the unit was sprayed Bright Orange I painted the tracks rust with a light dry brush of silver followed by a wash of black.


     And this is the area beside the Augusta East yard tracks where the units will be housed once the area goes through its makeover.


     I also had most of the crew over on Friday night for one of my regular last Friday of the Month operating sessions. As it was two months since the last (we were on vacation when the May session was planned) I thought I should clean the track and loco wheels. I'm very pleased I did as I was surprised that the track was a bit grimy but it was the locos wheels that really surprised.    
    
     For too many years to recall I have been using Zippo Lighter fluid to clean my track and wheels as too have many of my friends. We find it works really well. I have recently purchased some new cotton cloth from the local Spotlight store only this time found some much thinner than that I was using previously. Obviously the last lot of cloth was just too thick as when using the new lot my wheels have never looked better. I am surmising that the old cloth was not getting right into the radius of the wheels and thus leaving a large amount of gunk in place. The new cloth looked really dirty with really black track marks where the dirt had come off the wheels after cleaning the locos. Strong evidence that I should have been checking better and something to put in the memory bank.
     Here is a few shots of the ops session, apologies for those not represented

Big John at the dispatchers desk. John is the proud owner of the SF Boise City Sub.

Little John at Augusta (he's not really that tall)  Owns the UP Oregon Sub.
Darren operating the Win /Gut / Win Cement train switching at Winfield. Darren is a VR Signalling man and has a very nice Victorian N Scale layout.
Barry at Hackney pondering his next move with the Aug /Hac /Aug Grain. Barry purchased Thompson River Canyon from Vic and Myself several years ago.
Greg ( he owns the L&N Knoxville division ) is at Ponca City pondering his next move with the Fln / Pon / Fln Sweeper. There is not a lot of room to move at Ponca so one has to think very carefully about how to achieve the move and not hold up the main.
Dennis and Noel worked Flynn Yard. Noel is not in the picture. You can just make out Vic's cap, he was just departing with the Fln / Aug  Through freight. Dennis is in the process of building a very fine N Scale layout whilst Noel is the owner of the West Coast Mining RR in N scale.
Ron (the owner of the GC&SF RR ) is watching over the dispatchers shoulder.
     Me, well I was the dispatcher for a while and Mr Fixit for the rest of the night. Somebody has to do it.
     More next time on the SFRSD.
Rod.

24/06/2014

Time flies

Been a while since my last entry.

     I thought it was about time to get back and add another post since its been quiet a while since my last post.
     Winter has set in here in Melbourne gusts of wind yesterday up to 125 kilometers an hour 10 degrees C with a wind chill down to 4 degrees so apart from driving up to Brisbane and back four weeks ago not that much has been happening as we have been staying in doors.
     I am however working on some recently purchased GHQ kits. A shovel, Low loader, a D8Cat bulldozer, a Cab over Freightliner and another Grain Trailer. (Well you cannot have enough grain trailers in Kansas). The shovel is complete including painting, the low loader is well under way as too the bulldozer.
  
I have sprayed this with Tamiya Brilliant Orange, Dullcoated then a wash of VanDyke Brown.

More bits to add to this

      Apart from these I have been weathering some more locomotives. John a good friend and I attended the Plastic Modellers Exhibition held over the long weekend in June. It is always worth a visit to see how folk model plastic planes, ships, trucks and cars along with the military modellers who always impress. Some of the models on display were outstanding with just so much detail. I have always enjoyed looking at the military models. The way they can make these models look just so realistic is amazing. So I have often wondered why the military modelers and model railroad modelers haven't got together to share ideas I think we could learn a lot more about how to weather our locomotives and rolling stock. Then there is the vast range of paints and powders that are available that the military modelers have available to help create such masterpieces.
    A weathering clinic was about to start so John and I grabbed a front row seat and watched as this young fellow rusted up the back of a pre-painted tank using Tamiya panel line paint and weathering powders. The grills on this tank just popped. Granted it is a larger scale than I am accustomed to but I thought that some of these techniques could be applied to my locos.
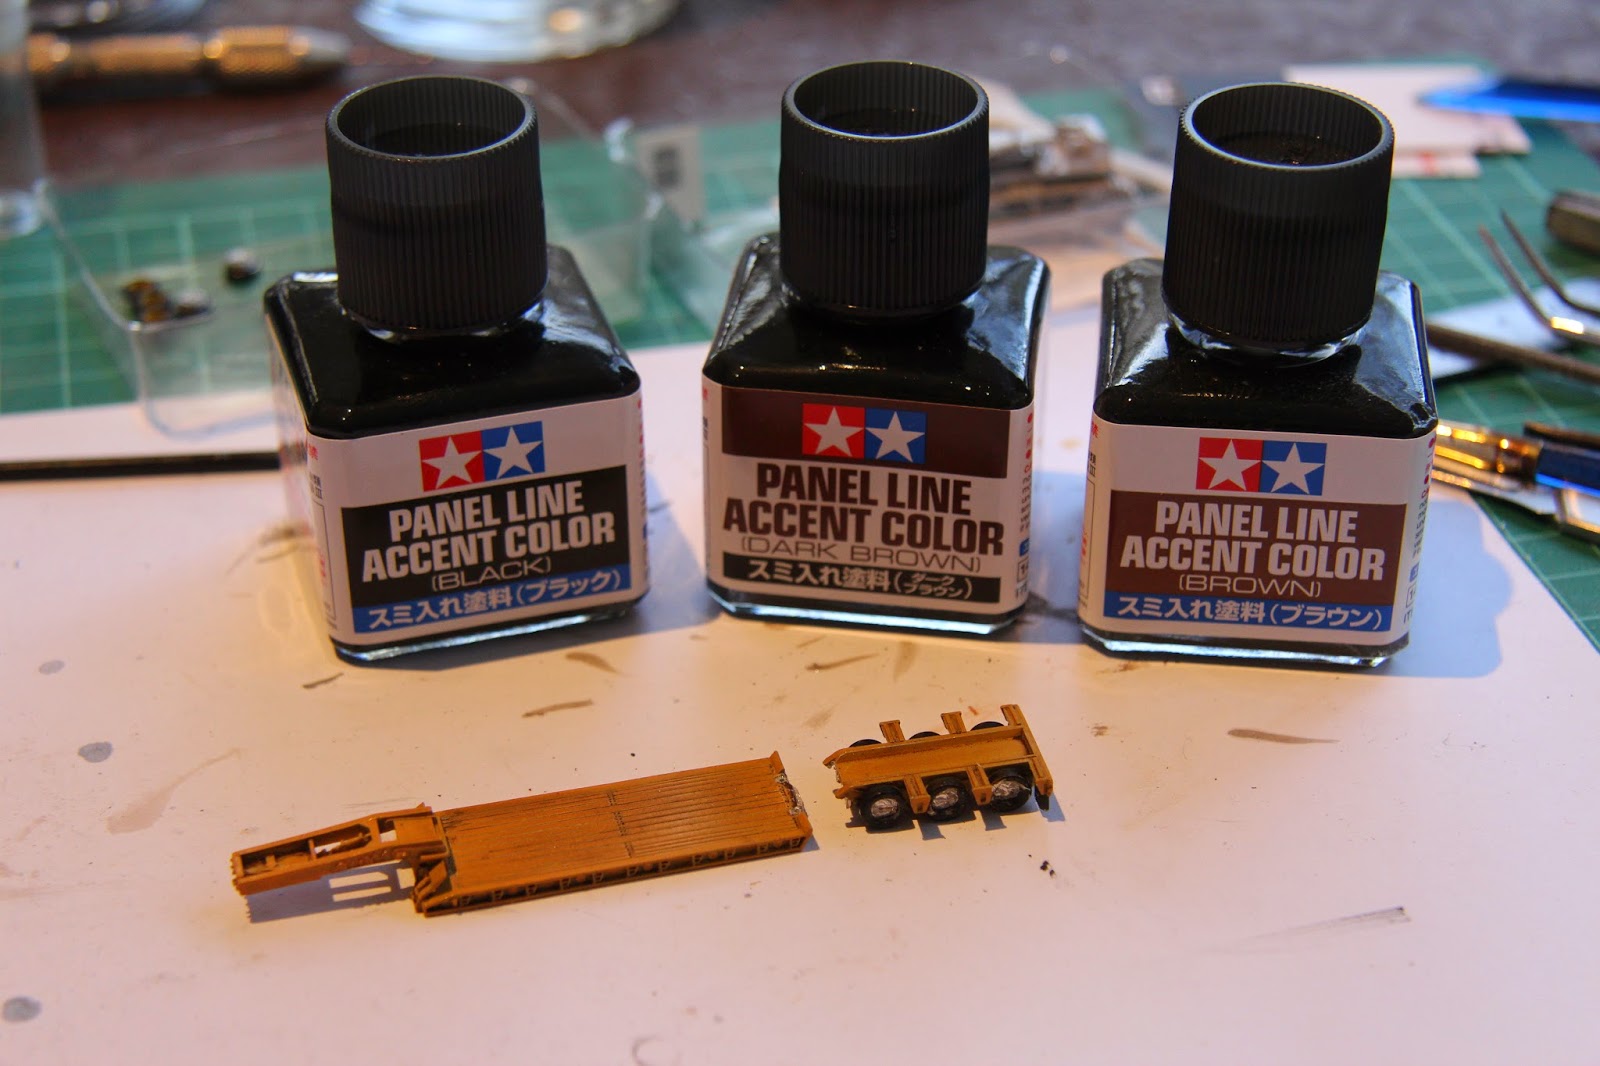
     The panel paint comes in three colours, Black, Dark Brown and Brown so I purchased one bottle of each.


   So far I have used mostly the Black and Dark Brown in the grills and fans on about 6 locomotives. This makes the job of blackening the grills so fast it is done in minutes. You might recall in my last post that it took me about one hour to mask up one Alco Locomotive to spray the grills on a locomotive I was spraying for a friend. Well that job is history I will be using this technique from now on.

    Here is a shot of a highly weathered SD 45 that I had previously painted and decaled for the failed merger between the Santa Fe and Southern Pacific RR's. I had previously dulled down the body of the loco with a light spray of flat white and thought this would be a good candidate for a test run.

I used the Tamiya Panel Paint on the grills, fans, truck side frames and around the roof and the roof mounted air conditioner.  
     I applied the panel paint very carefully in small amounts around the doors and door latches, around the turbo shroud and around the battery box doors. It is hard to see the difference in my rather poor images however on the RR it looks fantastic, I am very pleased.     
     I also added some Pan Pastel rust powder along the roof and on some of the fans and grills. A small dab of rust under the battery box and she was ready to put back into service, shabby but now she really looks like she has well and truly earned here keep on the SFRSD.

Well that's it for another post so thanks for stopping by.
Rod.

14/05/2014

Custom Painting part 2

The next step.
     I spent about one hour in total masking up one of the C628 Loco's last night and early this morning so I could use the good weather today to spray all of the grills. What a job, boy these units have just so many grills on either side and on the roof I am pleased I have only done one thus far.
     I realize that the front and rear most grills on each side will have some decal strips across them however they can be weathered up afterwards.
     Yesterday I mentioned I was going to use flat black with a dash of rust. I changed my mind and only sprayed them the flat black as I now want to wait until the decaling is complete before I do the other 3 locos and then I can weather them completely.

     Here is a rather poor shot of the C628 with the grills painted and after it had been given a very light coat of Testors Gloss Coat.


     Once the decaling is done and I can get to do some weathering on these I think they should pass.
     The four fuel tanks also got a spray of Flat Black today so now it is up to Graham to get decalling.

Cheers for now and thanks for dropping by.
Rod.

13/05/2014

Custom Painting for a Friend

Painting some F.N.M. Locomotives

     One of my friends is modeling the KCS in Mexico in N Scale and has an array of good looking locomotives and rolling stock on his roster. He has had four ALCO loco's 2 x C630's, 1 x C424 and one other I am not familiar with all undecorated sitting aside waiting to get them painted in the F.N.M. paint scheme. As I had not much to do I offered to have a go at painting them for him however he has to apply the decals all those thin red lines wow.
     We got together last Friday at one of our regular round robin model railway get togethers where he passed over the 4 stripped down body shells, 4 sets of walkways and several very small packets of hand rails.
     Obtaining paint to match the F.N.M. here in Oz is tough so Graham purchased a Tamiya light blue for the center stripe and a darker Tamiya blue for the rest of the body. The orange for the handrails was a tough stretch however I had a small can of Humbrol mat orange that looked like it might be close to what he wanted.
     The weather is turning cold here in Melbourne however we are having a warmer than normal week so it is a good time to get in and paint these before it gets cold again.
     The first job was to mount the body shells on discarded toilet roll centre tubes as these make very handy stands to hold shells whilst painting.  I mounted the cabs on the little holders that you will see in the images below. Similar to these were found by another friend in a $2.00 shop however I purchased mine off E Bay and very cheaply at that.
     I then mixed the lighter of the blues with mat white to get it closer to the color we wanted and gave the shells a couple of light coats.
     The shells were left to dry overnight so the next job was to spray the handrails in the orange, again the stands with the clips were invaluable at holding these not only whilst spraying but whilst drying also.
     The shells were then masked to get the light blue stripe. These needed to be 5mm, no, Tamiya does not make 5mm masking tape so I cut 10mm strips into two using a medical scalpel and worked at getting them nice and straight. Using my dividers helped at making sure I stayed true to the position all way around the loco.

     So here is how the shells looked after the first coat and masking for the dark blue sitting on the toilet roll tubes.


     I had to learn the hard way and that is before you put on the next coat of paint if it is a different colour is to give the shells another coat of the first colour over the edges of the masking tape. This helps to stop the second coat bleeding under the masking tape and gives a much sharper line so this I did.
     The second darker blue was also mixed with some flat white to get it a little closer to what we wanted and then applied.

     And this is how all four shells have turned out thus far.


Ignore the cases that the locos are resting on they are for this purpose only.

      I have hand painted the battery boxes and the front and rear pilots on the walkways for to mask these would have been to fiddly and taken just too long.
     The next step it to mask the shells again so I can spray all of the grills with a flat black with a bit of rust colour added so these babies look like they have been working. The weathering will be completed once Graham has added the decals. A bit more work to go before they are finished however I can hardly wait to see these ALCO Locomotives running on his RR earning their keep.

So until the next post thanks for stopping by.
Rod.


27/04/2014

April Operating Session

Friday night the 25th May Ops session

   I have an operating session on the SFRSD with most of my mates attending the last Friday of every month. This can range from about 8 to most of the time 12 of us.
   Last Friday we only had 9 to operate which as it turned out worked well. I sat at the dispatchers panel for the night and worked my butt off, one does not realise just how busy it gets once the timetable starts when every signal and turnout on the main needs attention.
   Action started at about 7.45pm after we firstly installed a new Tam Valley combined circuit breaker and booster for Augusta. Over the past few weeks we noticed that the Augusta yard would shut down and found that as more locos arrived this seemed to be the cause. Brendan suggested that this CB could solve the issue. Once connected Augusta behaved perfectly all night.
   Most Friday ops sessions we have struggled to get all the way through however this was not the case last Friday as the Timetable was completed in good time.
   We stopped for "beans" at 9.00pm about half way through and wound up at about 10.45pm with all trains plus one extra from Augusta to Winfield and return completed and of course we just had to run the Directors Special pulled by the new E8.
   As a side the picture of the E8 on the SFRSD is in "Great shots" in the May /June N Scale Railroading along with some from Gordon Bliss with thanks to Kirk.
  
Here is #85 arriving from Augusta East ready to take on the VIP's for the trip across the system.

Two GP60 B units sit at Augusta waiting to be put into service

    The RR operated very well with only a few glitches to be looked at before the next session.
    A great night was had by all the crew so bring on the next session.
Thank you for stopping by.
Rod.
  

08/04/2014

Rigging complete

Finally added the rigging
    Well it's been a while however I finally got around to rigging the cables on the side boom crawler today. I had a good reason as it's been raining all day and last night too. We needed it here so nobody's complaining.
     The thread that comes in the kit is quite fine and fairly lint free so I chose to use it. Only issue is that none of the pulleys have the holes in which to thread the cable to have it look anywhere reasonable. So with my optivisor on, good room light and desk light all switched on I set to to drill out all of the pulleys. These came out fairly well so the next task was to thread the cable. This went better than I thought so I was well on the way. I wanted the cable to look taught so as I super-glued the cable to each pulley I applied some tension to the cable by laying one of my weights on the cable.  
     The boom was first and it came out pretty good. Today I did the hook and cable and again put some weight on the hook as it was drying.

I did a bit of dry brushing on the edges of the unit to make it look like it has been put to good use.

   
    Well that is another item waiting to be installed. It should make a nice scene on the SFRSD once installed with some other detail parts.

Thanks for dropping by.
Rod.